
Having multiple users on a website often becomes mandatory when you need collaborative content management. WordPress allows you to create and add unlimited users, defining their roles as you want. Whether you want to grant access to a team member or a guest blogger, you simply have to create a new account.
In this article, I will cover an easy guide on how to create a new user in WordPress, defining his/her role. I will also cover the use cases of different types of user roles in this post. Let’s begin.
Types of User Roles You Can Create in WordPress

You can create six types of user roles in WordPress. I have listed them below mentioning some of their use cases.
1. Super Admin
The Super Admin has full control over the entire network of sites in a WordPress Multisite installation. They can create and manage new sites, install themes and plugins, manage user roles and permissions, and perform network-wide settings and configurations.
The Super Admin role is typically assigned to the site owner or administrator who oversees the entire network.
2. Administrator
Administrators have access to almost everything on the site, including managing plugins, themes, and other users. They can create, edit, publish, and delete posts and pages, as well as perform administrative tasks. This role is typically assigned to site owners or webmasters
3. Editor
Editors have access to all posts, pages, comments, categories, and tags. They can create, edit, publish, and delete content, including content created by other users. This role is suitable for content managers or editors who need to review and manage content on the site.
4. Author
Authors can write, edit, and publish their own posts. They have control over their own content but cannot modify or delete content created by other users. This role is ideal for individual contributors or guest bloggers who need to create and manage their own content
5. Contributor
Contributors have limited capabilities and can write and edit their own posts, but they cannot publish them. Instead, their posts need to be reviewed and published by users with higher permissions, such as Editors or Administrators.
6. Subscriber
Subscribers have the most limited role and can only manage their own profile. They cannot create or edit content on the site. This role is often used for users who want to receive updates or access restricted content on the site.
How to Create a New User in WordPress (Step-by-Step Guide)
Although it may see difficult, the process of creating new users in WordPress is simple and easy. I will show you the process in this section.
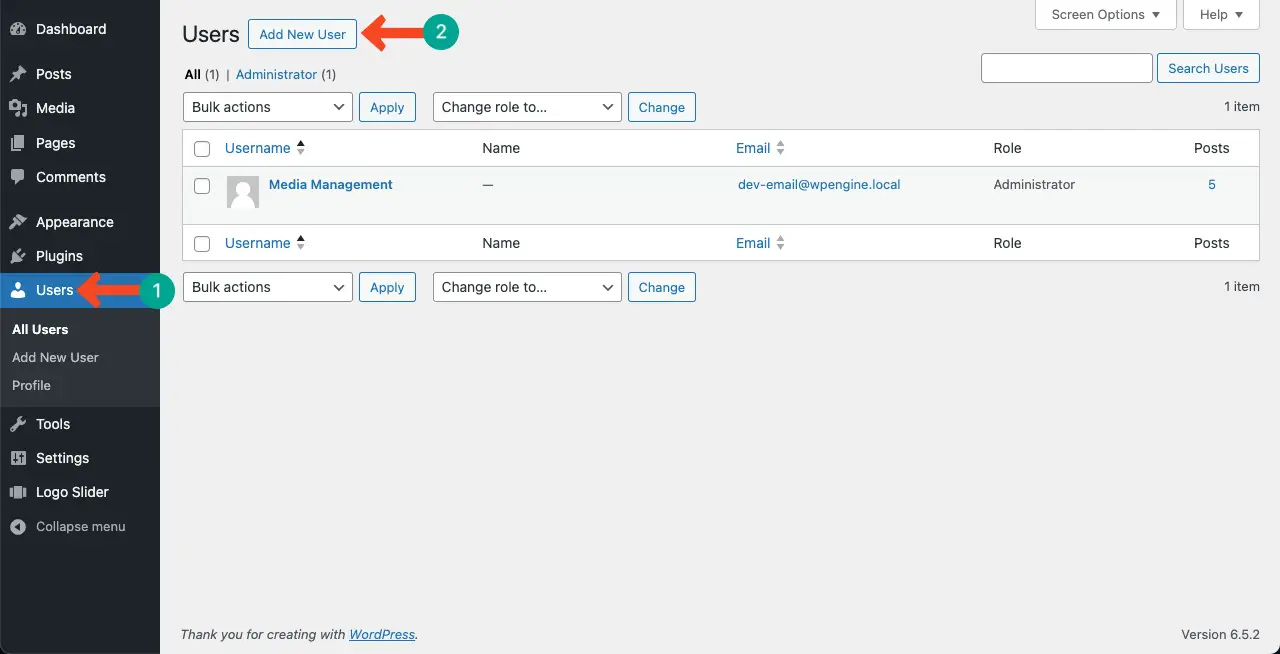
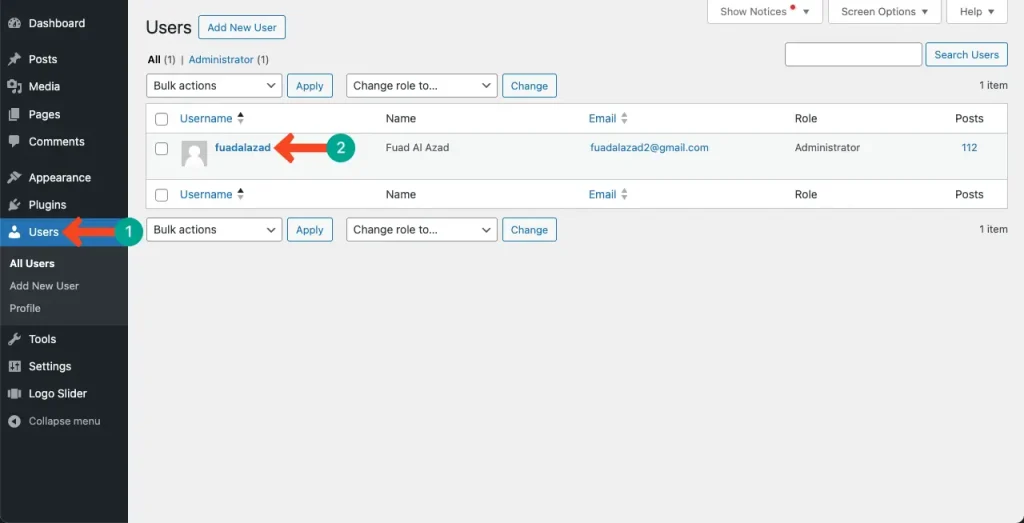
Step 01: Navigate to the User Section
Log into your website. Navigate to WP Dashboard > User.
Click the Add New User button.
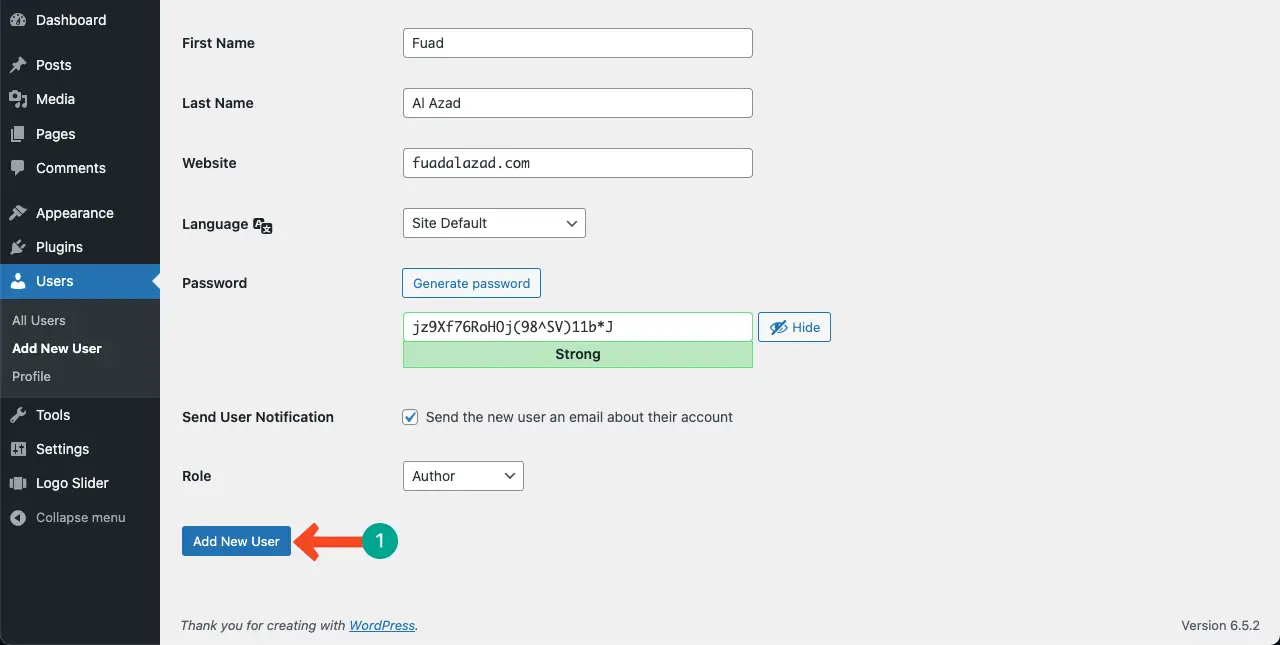
Step 02: Fill Your Personal Information
You’ll see a good number of fields, asking for your personal information. Two of them (Username and Email) are mandatory to fill. Although others are optional, it’s better if you fill them up.
You may type your desired password or generate a new one automatically just by clicking the Generate Password button.
Don’t forget to copy and remember the newly generated password.

Step 03: Set the User Role
Scrolling down a bit below, come to the Role section, which is at the end. Click the dropdown list next to the Role option.

The dropdown will show up all the user roles available. Select the one you like. For this tutorial, I will select the Author option.
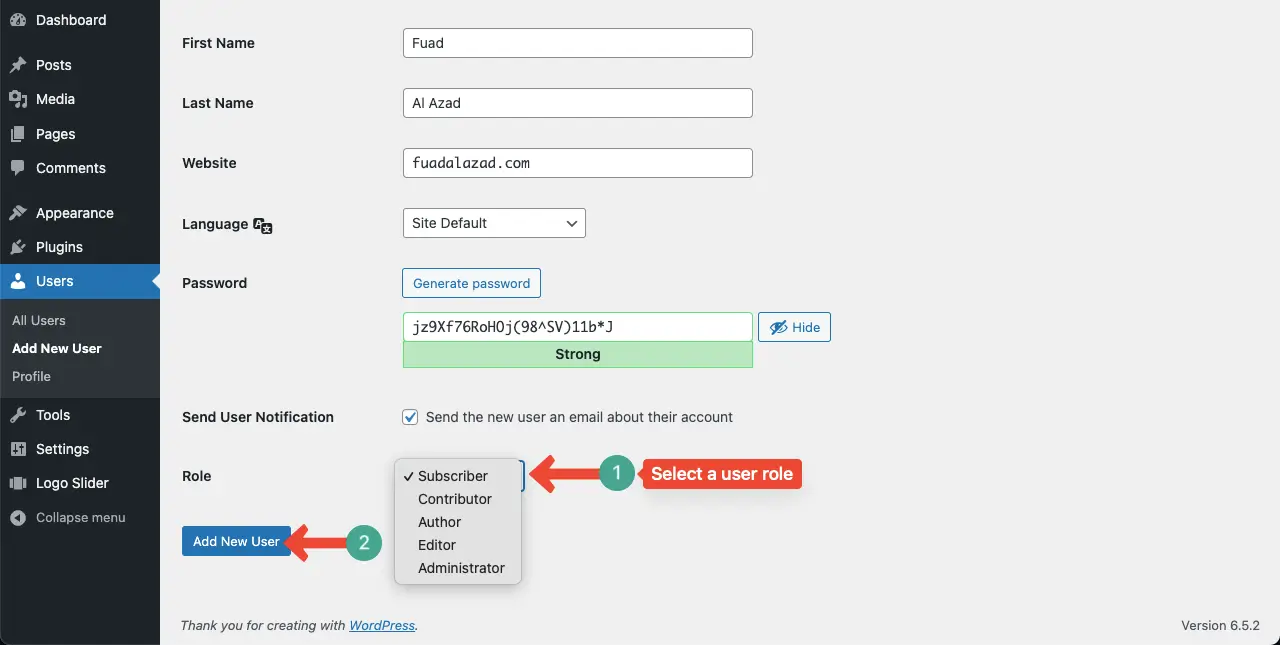
Finally, click the Add New User button to save the newly created user.
So far, you have just registered a new user. You now have to update the use profile with a bio, color, avatar, and other options.
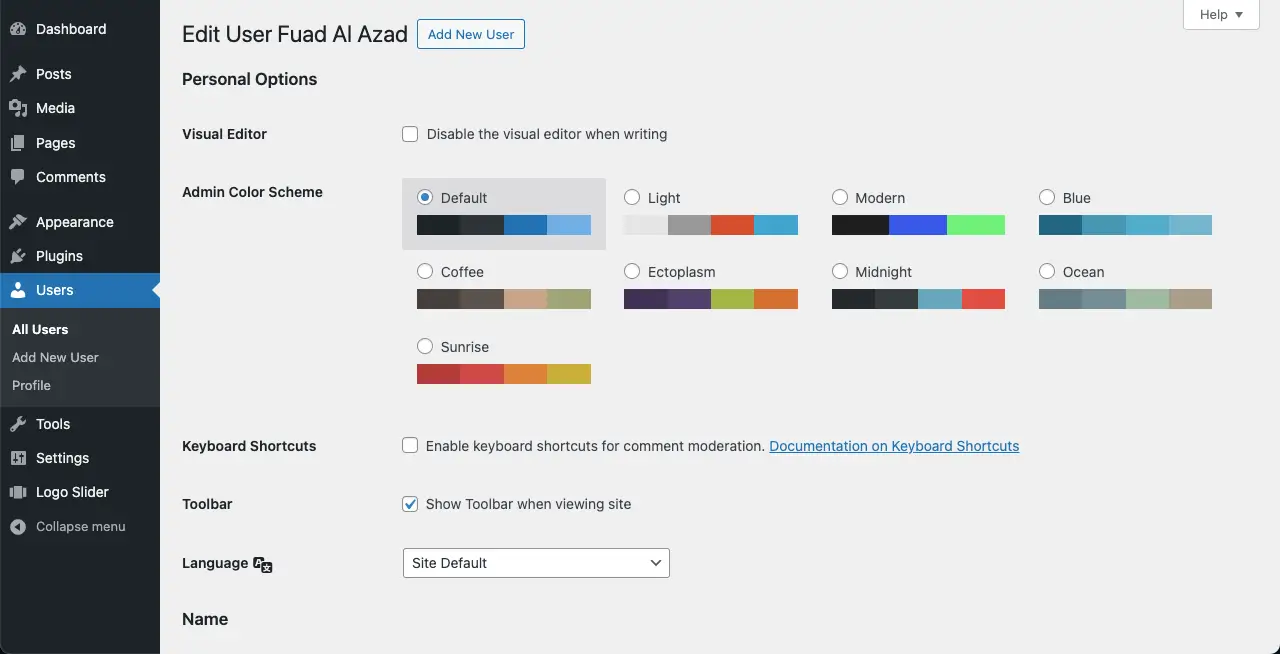
Step 04: Modify and Update the User Profile
Come to the Users page. Click and get into the account you have just created.
Tick mark the options you want to enable on your newly created user profile.
Scroll down a bit below. Add a brief information about you into the Biographical Info box.
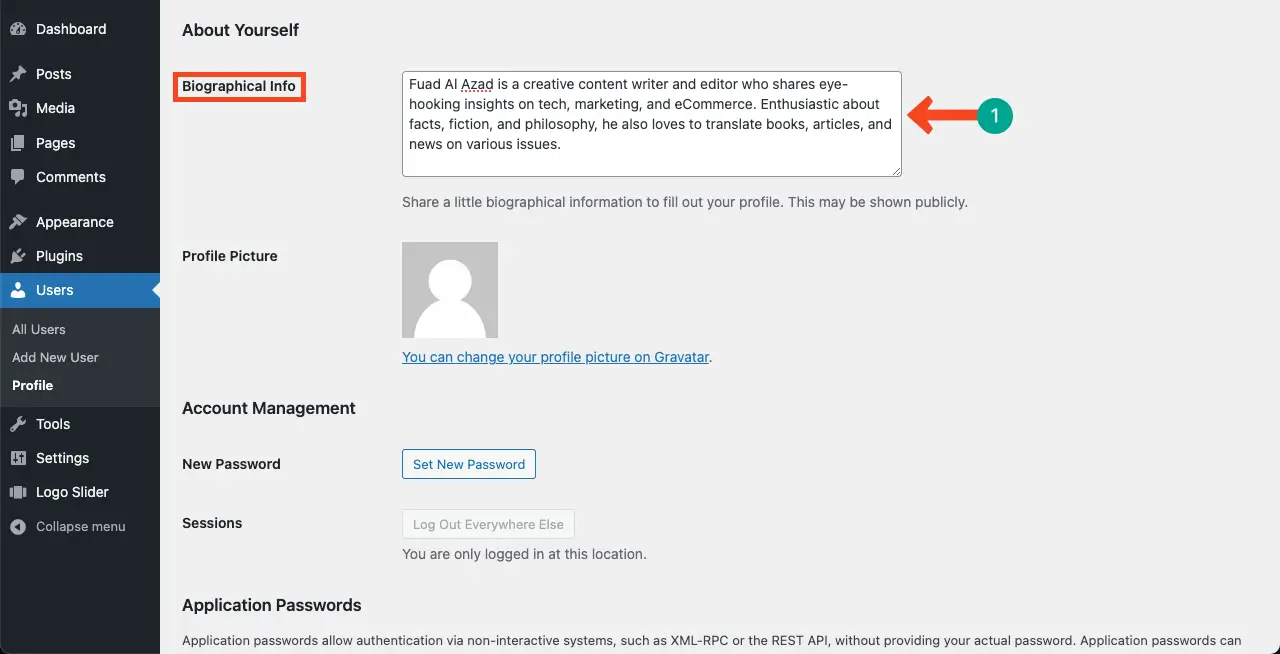
Step 05: Add an Avatar to the WordPress User
To add the Profile Picture for the newly created user, click the link You can change your profile picture on Gravatar.
You’ll be taken to gravatar.com. Sign up and then log into it.
Into the About page of your account on the platform, add your photo, display name, and a short bio.
Click the Save Changes button to preserve all the changes you have made.
Once you are done on gravatar.com, you’ll be redirected to the User page on WordPress. If not, reload the User page.
You’ll be able to see your photo in the Avatar box. Click the Update Profile button to save all the changes.

Thus, you can create new users on WordPress and assign roles for them. Explore how to use the Gutenberg Author block in WordPress.
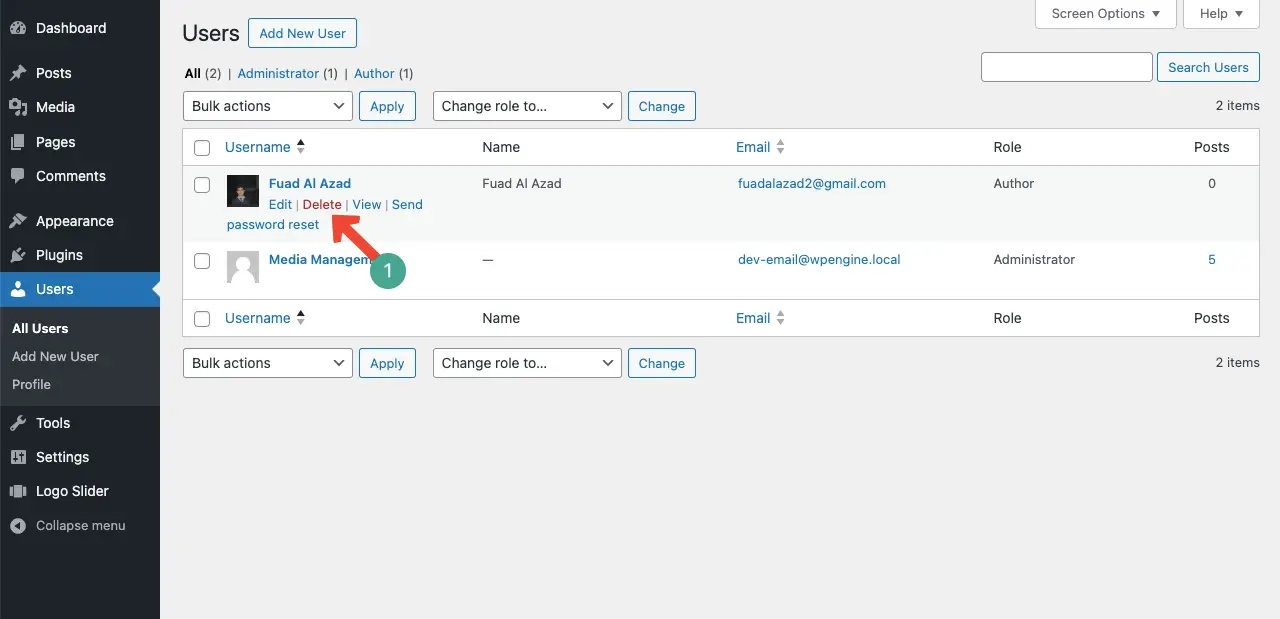
How to Delete a User Profile in WordPress
It’s simple. Come to the User Page. Hover over the user you want to delete. You’ll see the Delete button.
Clicking the Delete button will remove the user from your website.
FAQ on How to Create a New User in WordPress
You cannot manage a WordPress website without users. So, you might have some questions in mind about this special feature. Let’s explore their answers to some common questions below.
Is the user biography important for SEO?
Google’s guidelines mention the importance of author biographies and credentials in determining the value of content and establishing expertise, authority, and trust (E-A-T). Author biographies can provide signals to Google about the author’s qualifications, work history, and professional registrations.
Total how many users can I create in WordPress?
In a WordPress Multisite – No limit
WordPress.com – No limit for public blogs, and 35 use limit for private blogs
WordPress.org – No limit
Can the WordPress author bio generate backlinks?
If your author bio is so appealing, some other website may link it to their site to showcase your bio as an example. Thus, it can generate backlinks.
What are the things to consider when creating a user in WordPress?
- User role
- Username
- Email address
- Profile information
- Avatar
- Privacy settings
When to delete a user profile in WordPress?
In the following situation, you can think of deleting the user account.
- Inactive accounts
- User requests
- Security concerns
- End of user relationship
- Exit from the content ownership
Conclusion and Best Practices
creating a new user in WordPress is a fundamental task that requires attention to detail and adherence to best practices. Hope you have found this tutorial post helpful enough to quest your exploration. Below, I have covered some best practices that you may consider in this feature.
1. Assign Appropriate User Roles
By assigning the correct user role, you can control access levels and permissions, ensuring that each user has the right privileges for their responsibilities.
2. Use Strong and Unique Passwords
Create strong passwords that include a combination of letters, numbers, and special characters. Hackers can easily figure out if your password is small and weak.
3. Enable Two-Factor Authentication
Implementing two-factor authentication adds an extra layer of security to user accounts, making it harder for unauthorized individuals to gain access.
4. Educate Users on Security Practices
Provide guidelines and resources to educate users about security best practices, such as avoiding suspicious links, regularly updating plugins and themes, and being cautious with login credentials.
5. Implement Privacy Measures
Consider privacy settings for user profiles, allowing users to control the visibility of their personal information and choose whether to display their email addresses.
By implementing these best practices, hope you can enhance the security, efficiency, and user experience of your WordPress site.

