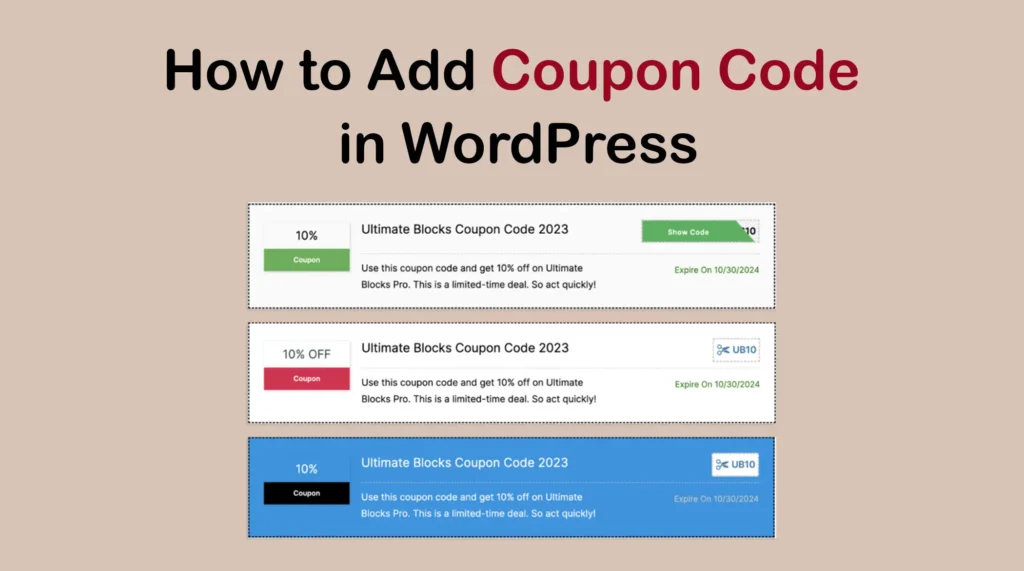
A coupon code is a series of letters or numbers that customers use at the checkout page to receive a discount when buying a product. It serves as a powerful way to shoot up sales and conversions in the online space.
Coupon codes can serve various purposes. For example, it can help you have new customers, reward a loyal set of customers, and encourage people to buy more products to save a considerable amount of money.
You can use coupon codes to create seasonal promotional or targeted campaigns. In this article, I will show you how to add coupon code in WordPress Gutenberg with an easy step-by-step guide. Get started!
Key Features of a Coupon Plugin
The default Gutenberg editor doesn’t have the coupon creation system. Because to successfully create and manage coupons, you need the following key features in that system that the block editor lacks.
Easy Creation & Management
The coupon editor must offer a user-friendly interface for creating, editing, stylizing, and managing coupons as many as we want.
Discount Types
It must have the ability to create different types of coupons so you can easily design and run your campaigns.
Expiration Dates
It should have the option to set a schedule for the coupon so it automatically expires on the due date.
Stylization
Without stylization, you cannot make the coupon codes distinguishable from others and catch visitors’ attention.
Responsiveness
As over 50% of traffic in most websites today comes from mobile devices, the coupon section should be perfectly responsive for mobile users as well.
How to Add Coupon Code in WordPress
As said above, the default WordPress block editor doesn’t have the ability to create and manage coupon codes. We need an additional plugin for that. In this case, you can consider the Ultimate Blocks plugin.
Ultimate Blocks is a well-known Gutenberg block plugin with 25+ multi-purpose custom blocks. Using them, you can create various stunning content on your site to captivate visitors. Among them, Coupon is a premium block of the plugin.
As the Coupon is a premium block, you need the following plugins installed and activated on your site.
Once these plugins are ready on your site, start following the steps explained below.
Step 01: Add the Coupon Block to the Editor
Like any other block, find and add the Coupon block to the Gutenberg editor.
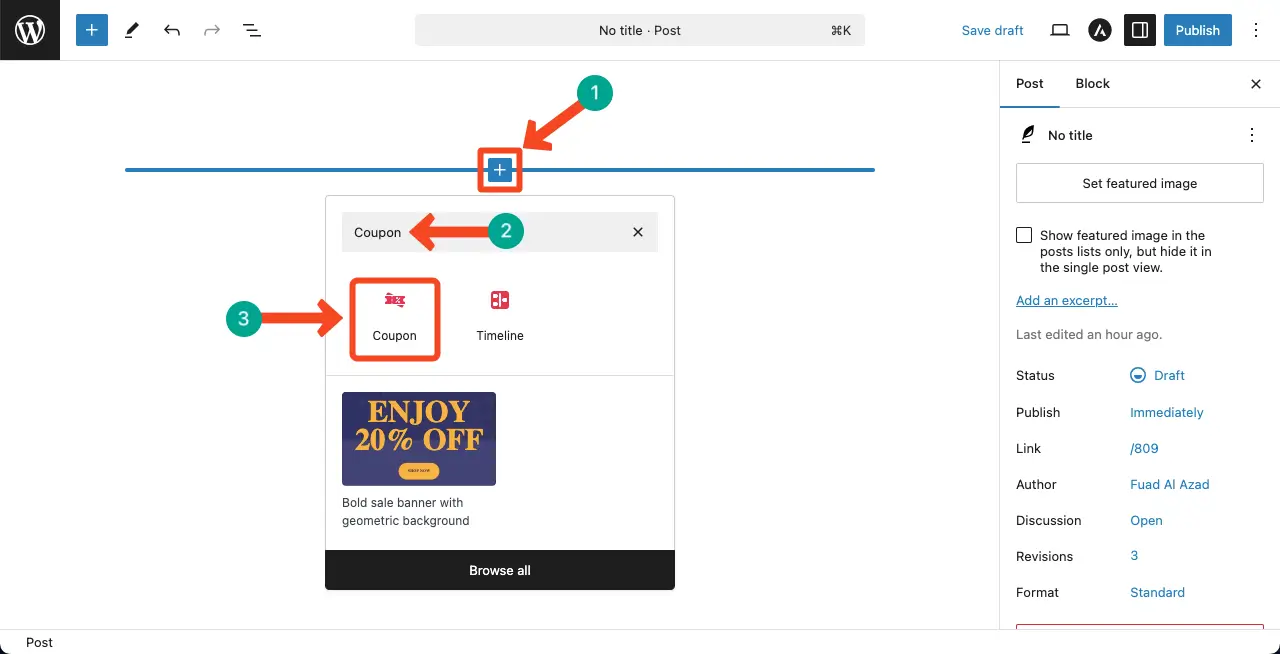
Click the plus (+) icon on the editor. Type Coupon in the search bar. Once the block appears, add it to the editor.
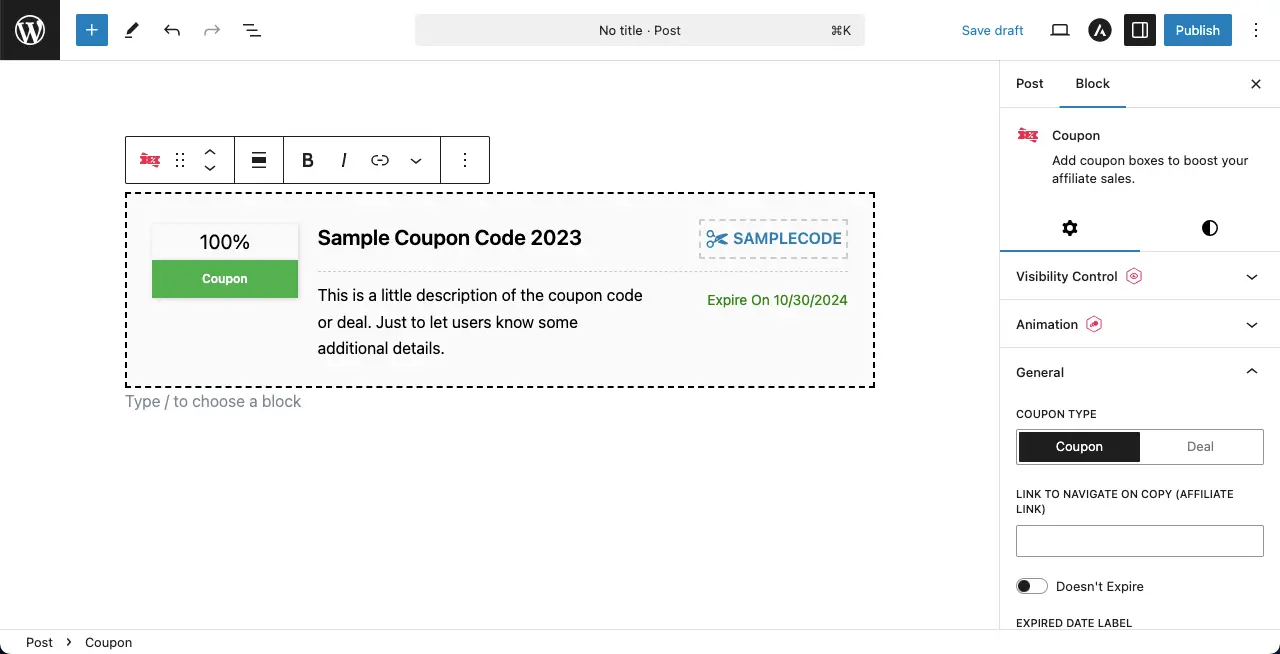
You’ll see a default coupon section is created on the editor.
Learn how to create a banner in WordPress.
Step 02: Select a Coupon Type
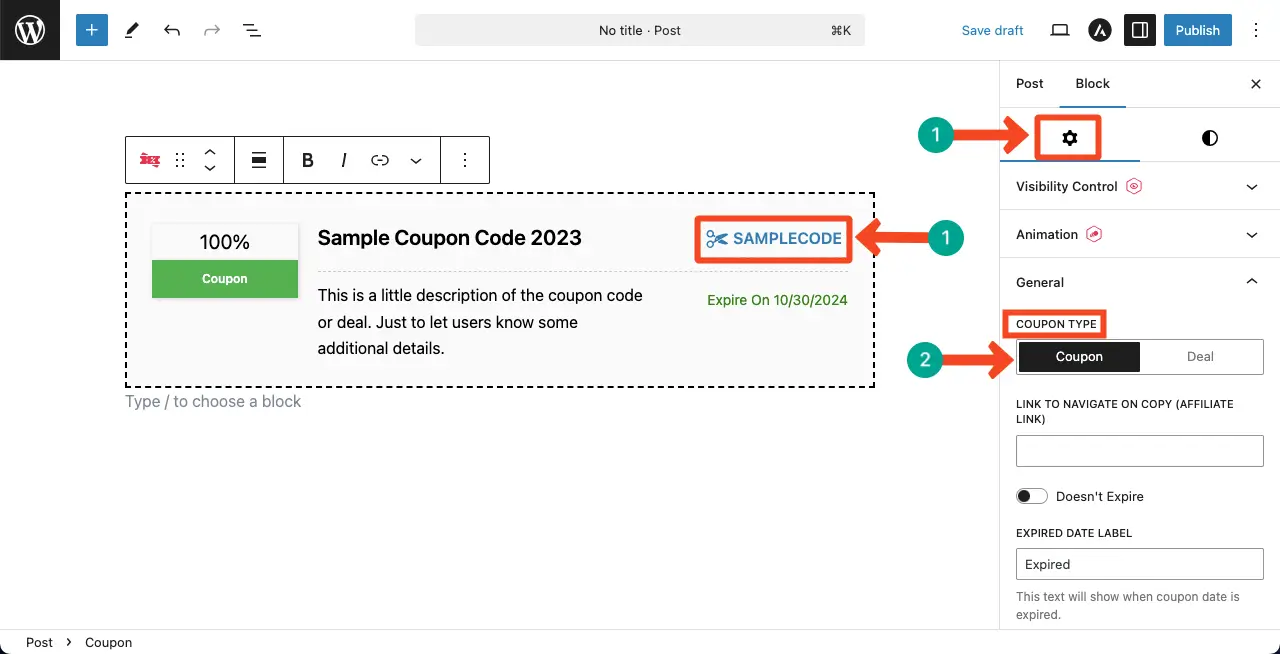
Before adding content to the section, you need to select a coupon type for the section. The Coupon block of the Ultimate Blocks plugin offers two coupon types. They are Coupon and Deal.
Select the one you want for your coupon creation.
# Coupon Type
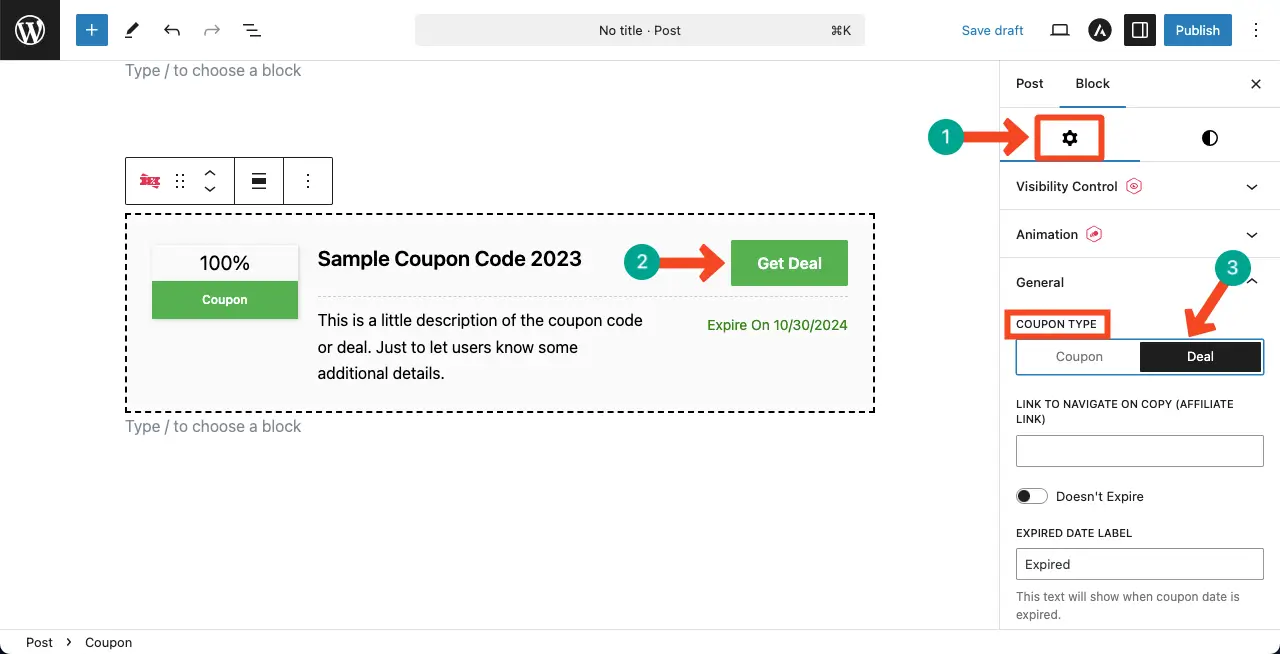
If the Coupon type is selected, you can write a coupon code in the section that users can copy and use on the checkout page.
# Deal Type
To enable the deal type, just click on the deal option. You’ll see the coupon section has been to Get Deal.
When users click the Get Deal button, they will be redirected to the checkout or any page you want to set.
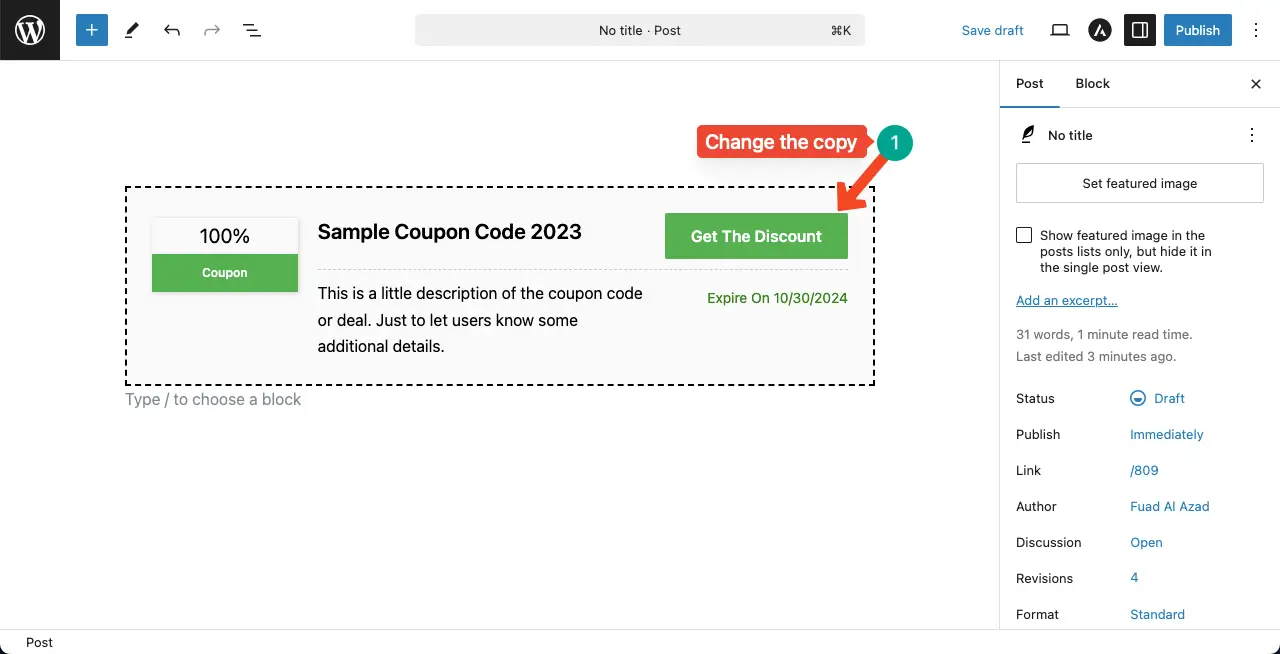
You can even change the deal copy. Just place your cursor on the deal section
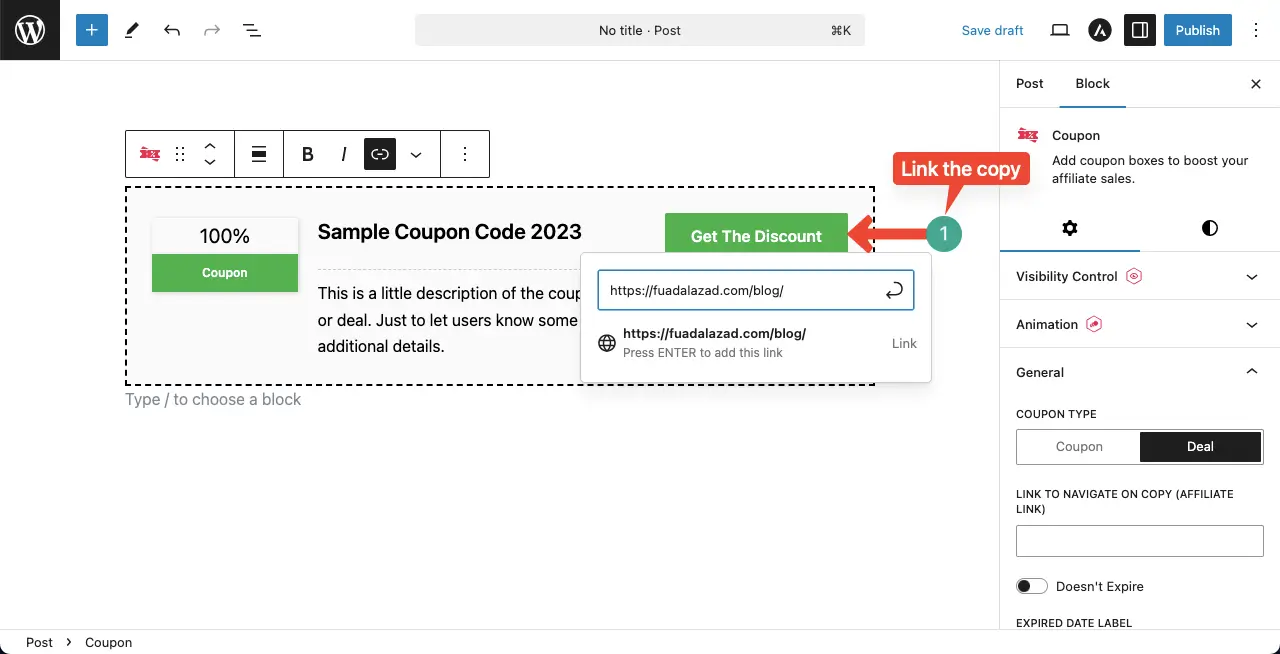
At the end, link your desired destination page to the copy so you can perfectly direct your users to the place you want.
Here’s a guide on how to add advanced heading block in WordPress.
Step 03: Set the Coupon Expire Date
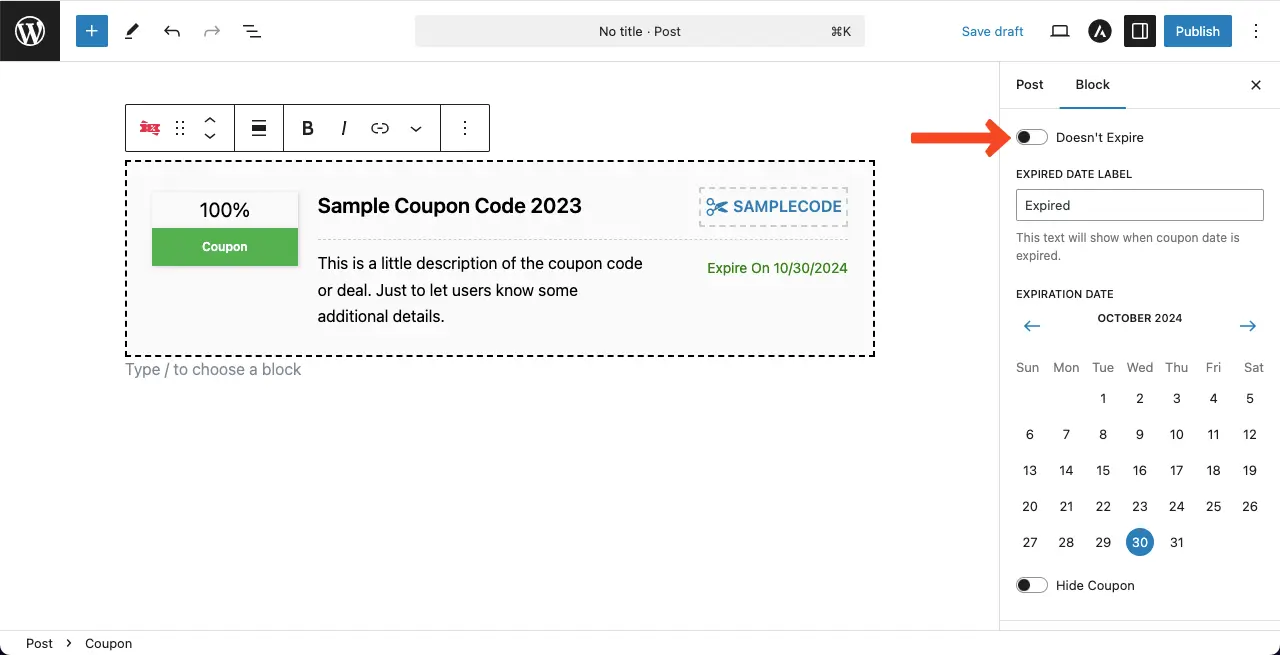
Scrolling down the General section, come to the Expiration Date section. Select the date when the validity of the coupon code will expire.
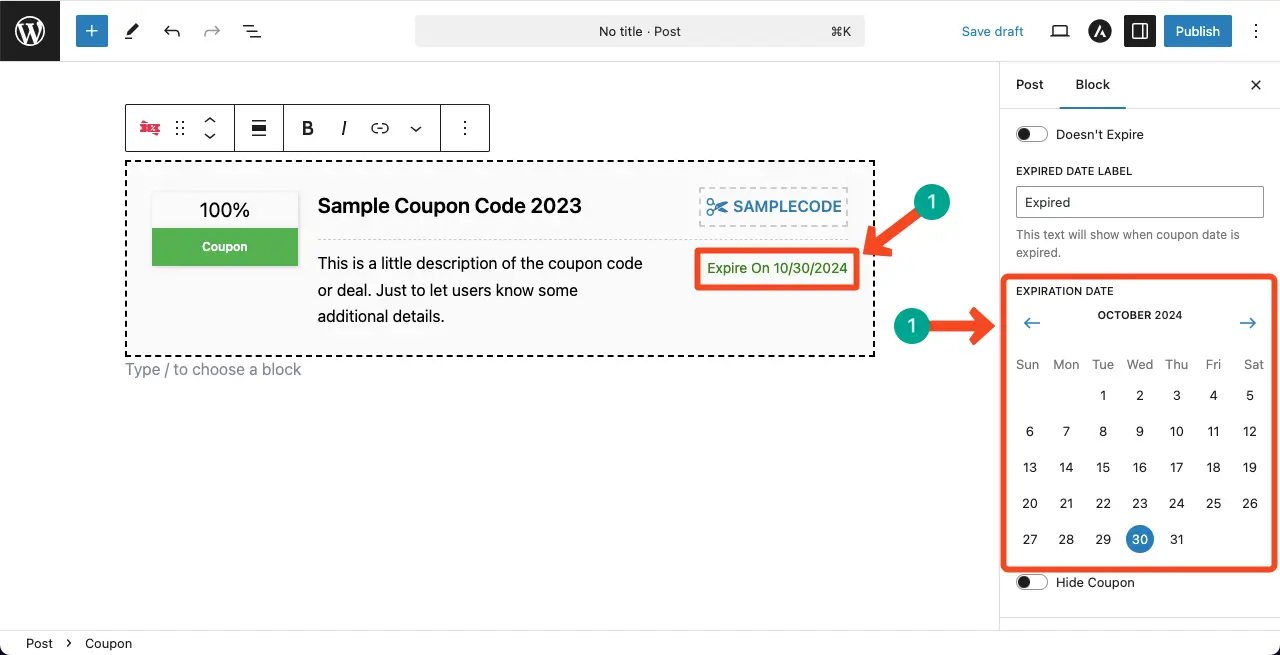
If you want the coupon code to never expire, just toggle on the Doesn’t Expire option.
Step 04: Add Content Throughout the Coupon Section
The coupon block allows you to customize every single piece of content within this section.
Just place your cursor on the content. You’ll get the way to remove, modify, and add something new as you want.
I have explained it in the video clip attached below.
Step 05: Set a Schedule for the Coupon Block
You may enable a schedule specifying when the coupon block will automatically appear and disappear at the end of the campaign period.
To do this, toggle on the Enable Schedule option. Then, set the starting and ending time for the block from the respective options marked below.
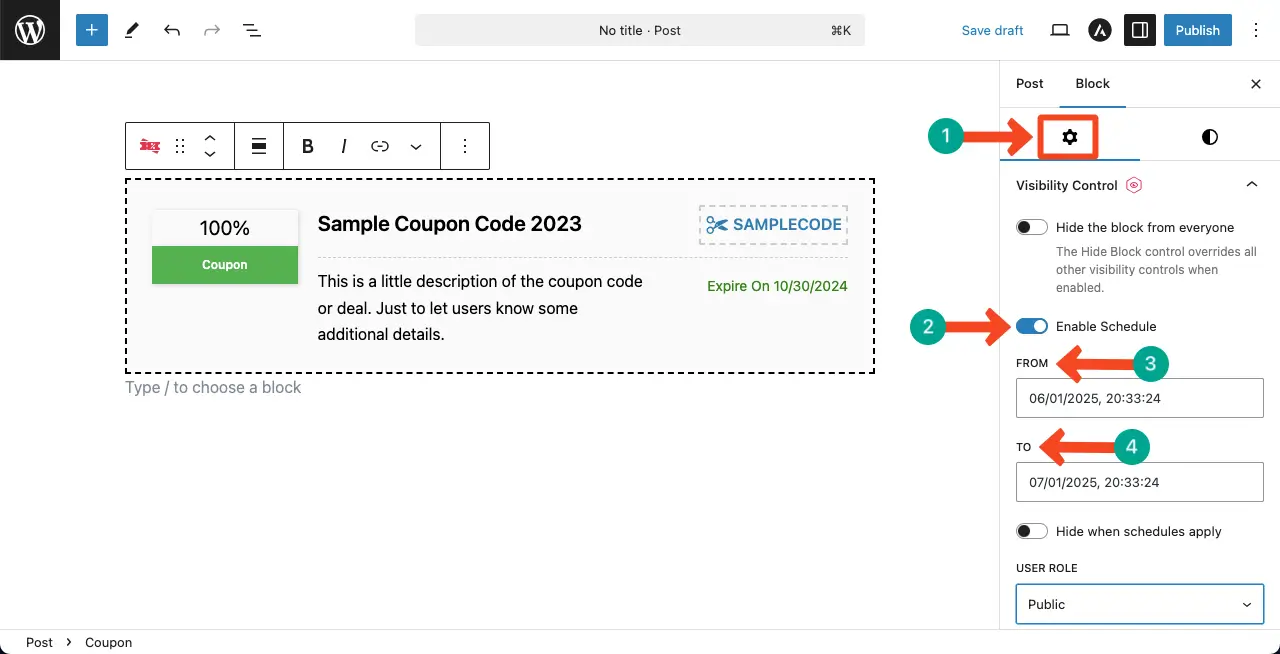
After that, toggle on the Hide when schedule apply option. Otherwise, the block won’t automatically disappear after the period ends.

Explore this post on how to add advanced text in WordPress.
Step 06: Specify Who Can See the Coupon Block
At the end of the schedule, you’ll see the User Role option with a dropdown list. Click the dropdown icon.
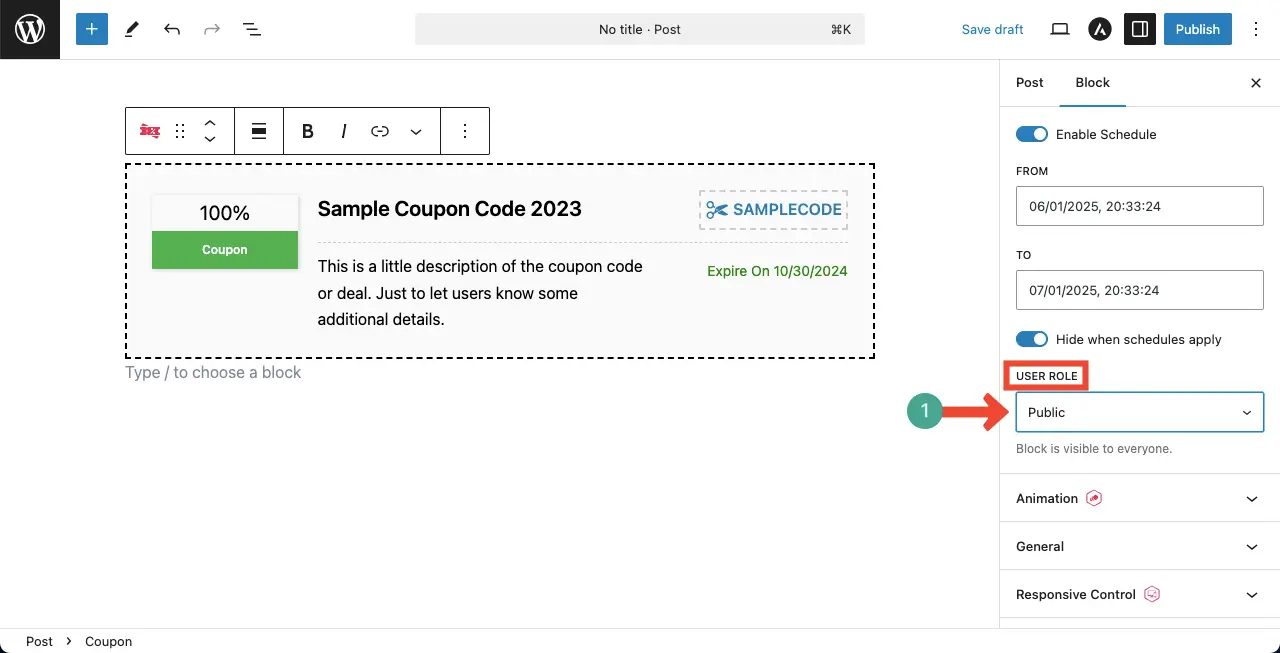
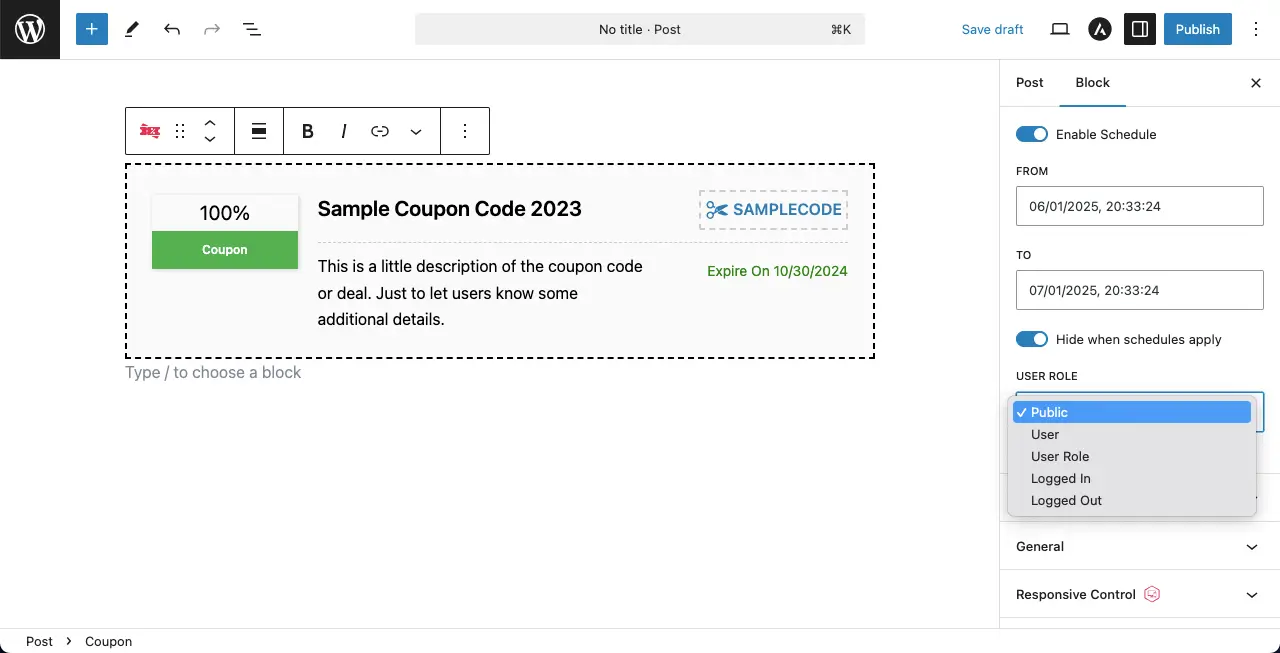
Select the type of users who can see the block.
For this tutorial, I am selecting the Public option, which means everybody who visits my page will be able to see the coupon code.
Step 07: Add Animation to the Coupon Block
The Ultimate Blocks plugin comes with 55+ animation effects for most blocks, including the Coupon block.
Expand the Animation section. After that, click the dropdown icon and choose the animation type you love.

I have explored a few animation types for you in the video clip attached below.
Once an animation type is selected, you can configure its settings, like repeat, repeat count, duration, delay, etc.
Do the needful changes you want.

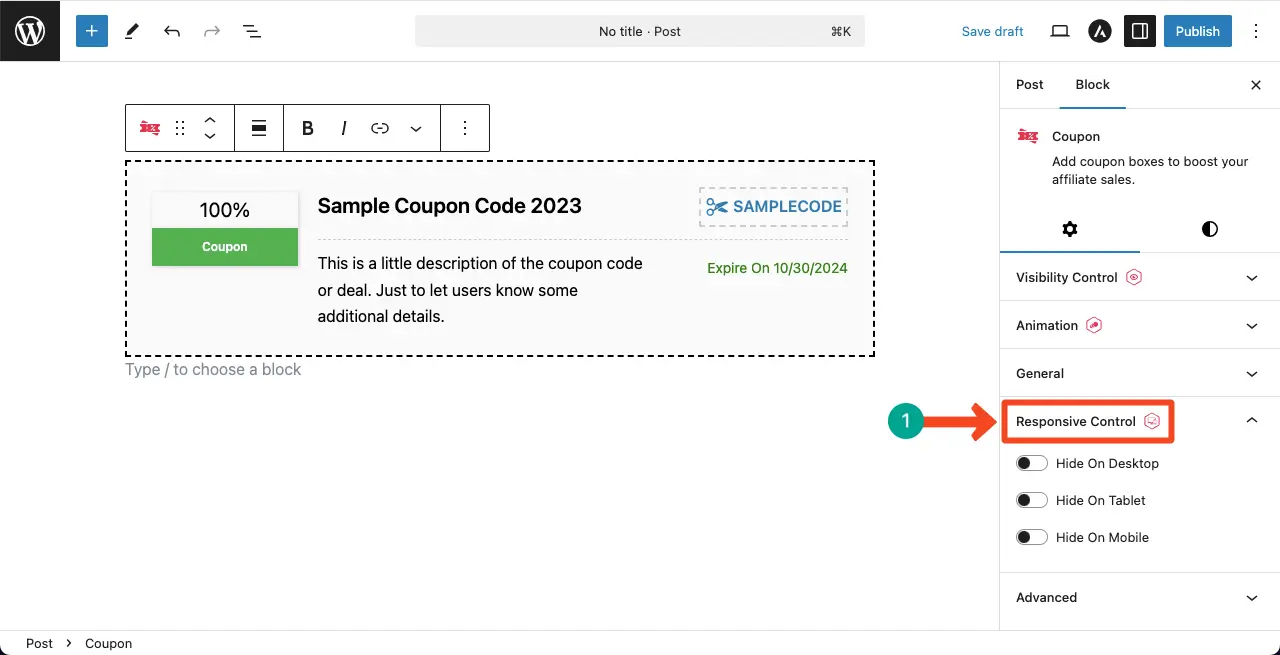
Step 08: Configure Responsive Control
Expand the Responsive Control section. It allows you to hide the coupon block on any device type you want. To do this, just toggle on the device for which you want to hide the block.
Check this guide on how to create an image carousel in WordPress.
Step 09: Stylize the Coupon Block
For a better appearance, you need to stylize the block. To do this, go to the Styles tab on the right sidebar.
You can customize the text color, coupon color, font size, hover effect, and more.
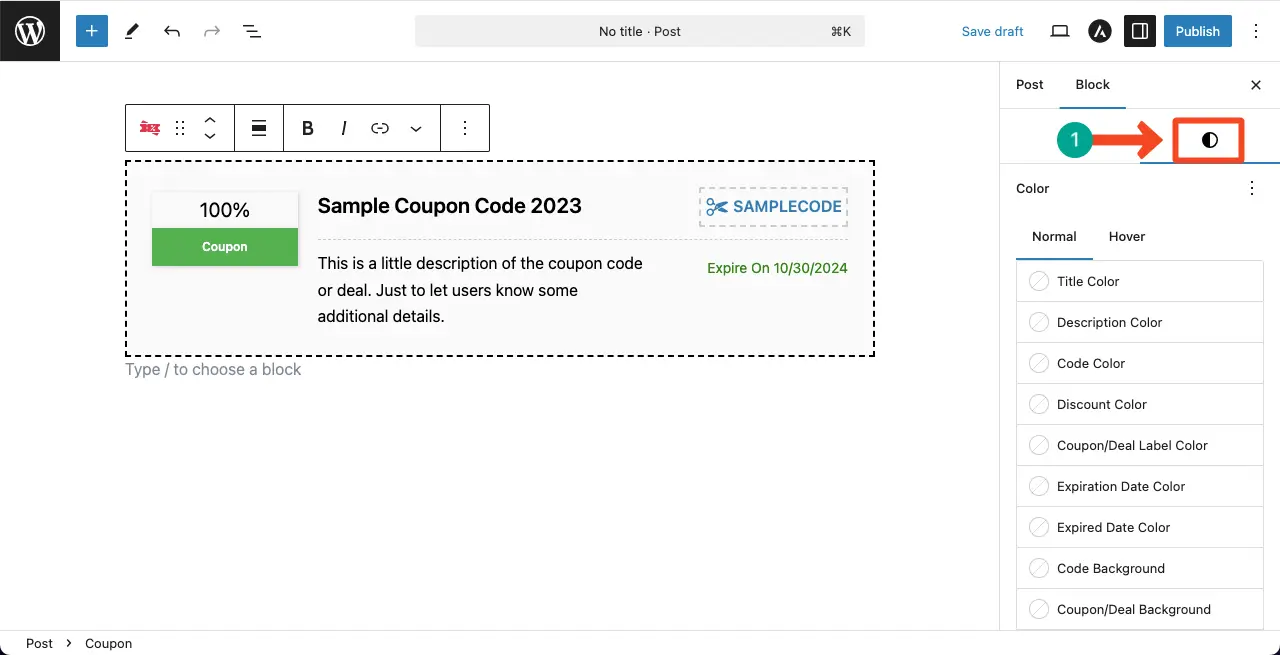
# Content Color
Take a quick look at how to change colors for the content of the coupon block in the video clip attached below.
# Typography
By scrolling down the tab, come to the Typography section. You will get options to customize the font sizes of all the content on the block.
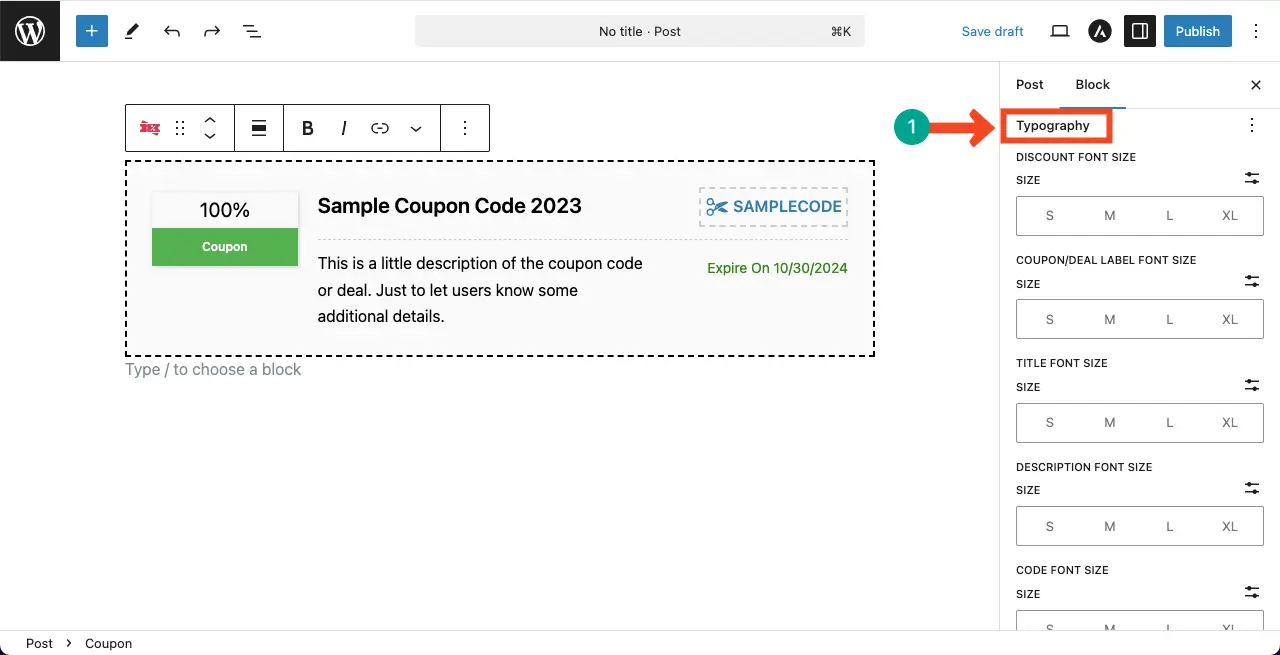
This video clip will give you a glimpse of how to change the font size of the coupon content.
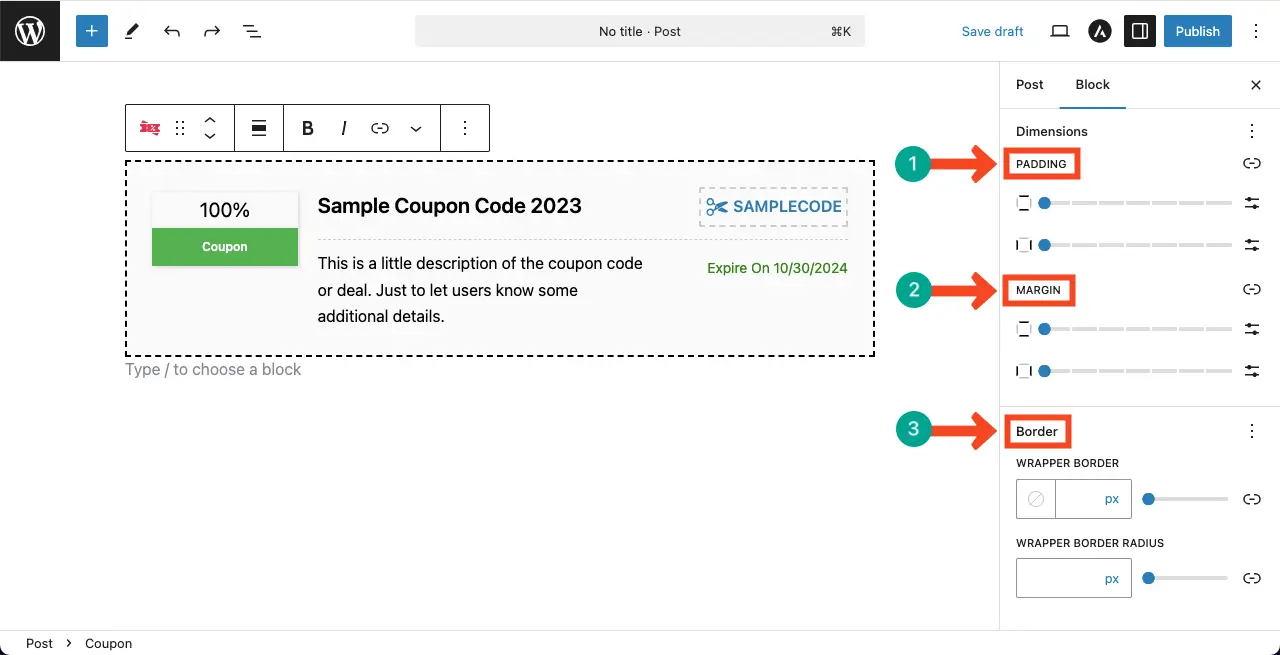
# Padding, Margin, Border
At the end of the tab, you’ll get options to customize the coupon block’s padding, margin, and border.
Step 10: Customize Hover for the Coupon Block
Under the Styles tab, you’ll see the Hover section. In the same way, as described above, you can set hover effects for the coupon block’s content
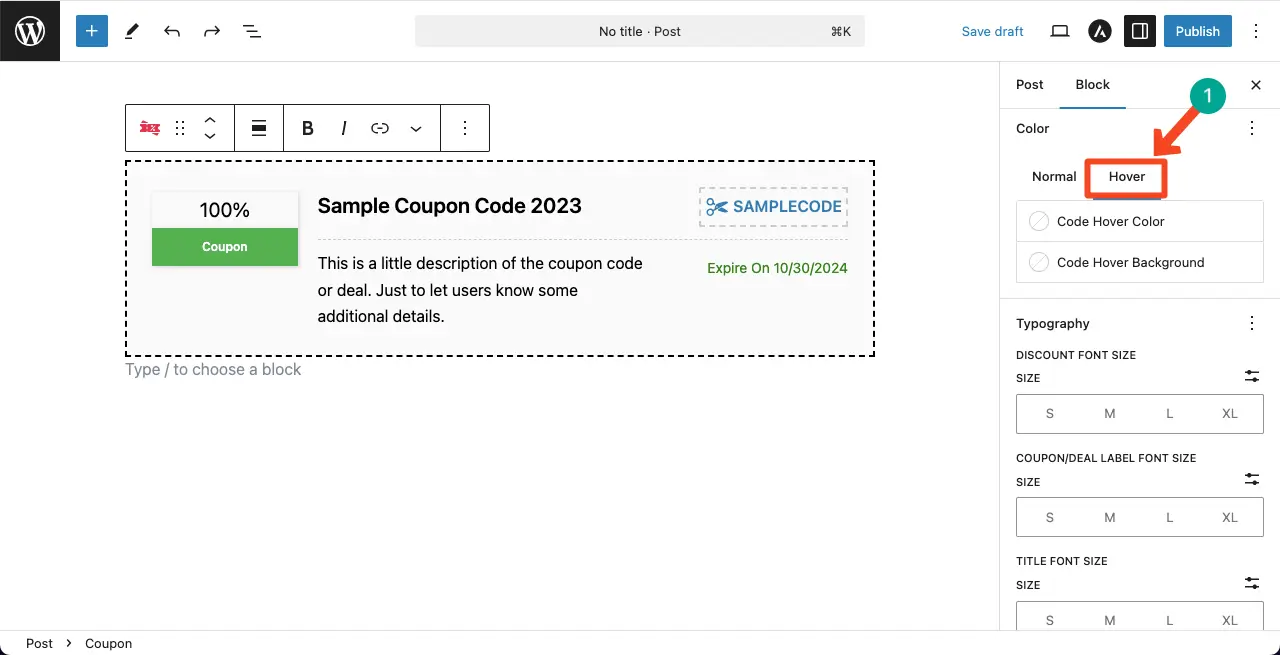
Thus, you can create and manage coupons in WordPress with the Ultimate Blocks plugin.
Conclusion
Adding coupon codes to your WordPress site using the Ultimate Blocks plugin is not just a simple task; it’s a fantastic way to boost your marketing efforts and connect with your customers. As you start implementing these codes, keep a few best practices in mind to make the most of your promotions.
Be clear and upfront about the details of each coupon. Let your customers know what the discount is when it expires, and any terms they should be aware of. This transparency builds trust and encourages them to take action.
Don’t forget to spread the word about your coupons! Promote them across your social media platforms, include them in email newsletters, and showcase them prominently on your website.
The more visibility you give your coupons, the better chance you have of attracting new customers and encouraging repeat business. It’s also a good idea to keep an eye on how your coupons are performing.
That’s all from me today. If you love my tutorial, please don’t forget to share it with me through the comment box below. Besides, if you have any suggestions, you can forward them to me through the comment or chat box.

